Selections are analysis queries that can be saved and shared to simplify common processes. They are built within the selections workspace and used to select records and group them for processing. Selections can also be used to separate data for analysis with tools such as Venn diagrams that allow visualization.
There are a couple of reasons why you may want to use selections:
-
If you create your queries as needed, e.g. by drag-and-dropping into a campaign, you would have to go through the whole process each time. By writing a defined selection, you can replace many drag-and-drop actions with a one-click solution.
-
You can provide complex queries for other users, giving them the ability to pull data without needing to recreate the query.
Note: when you pull through a selection as a field in editor, the selection will flag as TRUE where the value matches the criteria and display blank for everything that does not, unless committed to the database. Once committed the field will record the Boolean value against the criteria, displaying True where the value matches and False where it does not match.
The Selections Workspace
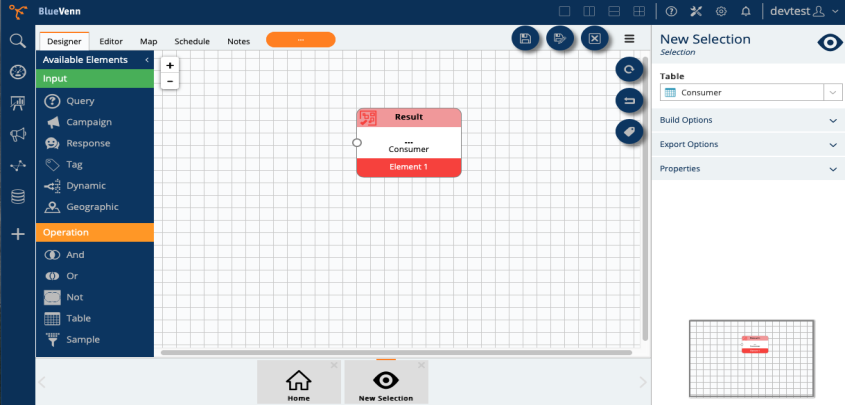
Opening a selection brings you to your main selection workspace. The workspace consists of five distinct areas:
- The workspace tabs, along the top of the page, change the View for your selection builder.
- The available elements panel, along the left side of the workspace, provides links to the tools you use to select, combine, and manipulate your data.
- The hamburger menu provides functions such as save and refresh for managing your selection.
- The selection properties area, to the right of the grid, is where you set the parameters for the selection.
- The selection canvas is a grid area where elements are added and linked to a result node.
Workspace tabs
- Designer: allows you to click/drag and create your selection, using the available elements.
- Editor: allows you to view the data in your selection, including syntax and records.
- Map: allows you to view the selection data as a map overlay and make new selections based on location and radius.
- Notes: A collaboration tab, where you can leave notes for yourself and colleagues.
- Count (Orange Box): Shows the count volume for your selection (or an ellipsis if the selection has not yet run).
Available elements
-
Input elements control what data is used for the selection. This is where you define the superset of data that you will select from.
-
Operation elements are what you use to combine, exclude or manipulate the data to create a specific selection of items.
Menu
The hamburger menu provides the options and settings for the selection:
- Save - Saves the Selection.
- Save As... - Save the selection under a different name or folder.
- Close - Closes the current Selection.
- Refresh Selection / Re Count - Recalculates the current selection. This calculates all nodes within the workspace and returns the new count value.
- Reset Field Settings (For use on the Editor Tab) - If you viewing data on the Editor tab, this option clears the fields currently in your view.
- Export/Download Data - Exports and downloads the data currently in your Count.
- Tag Data - Selecting this will allow you to assign a tag to this segmented set of data.
Selection properties
The options available in this area depend on what you have selected. Clicking on your clear workspace will allow you to configure the resolution level your selection operates at and will dictate how your results node will look. If you click on an input node, this toolbar will change with new options, to configure and edit your selected node.
Selection canvas
The grid area acts as a canvas for building your selection. Add nodes by dragging-and-dropping them from the available elements and link them to the result node.